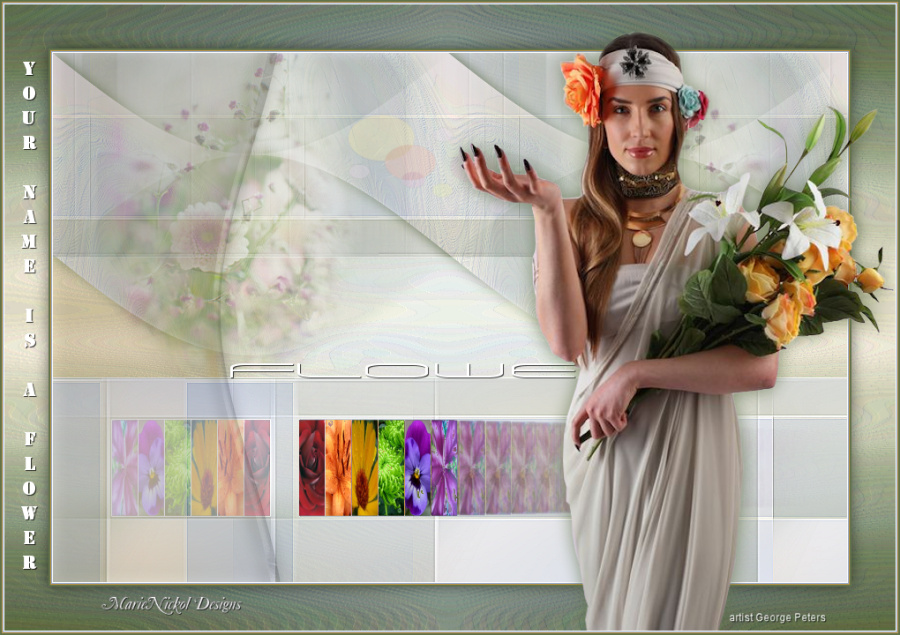
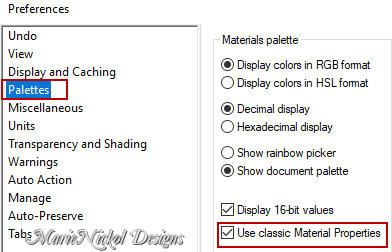
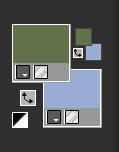
The Tutorial
Step 1
File - New - Open a new Transparent image 900 x 600 pixels
Effects - Plugins - Mehdi - Wavy Lab 1.1
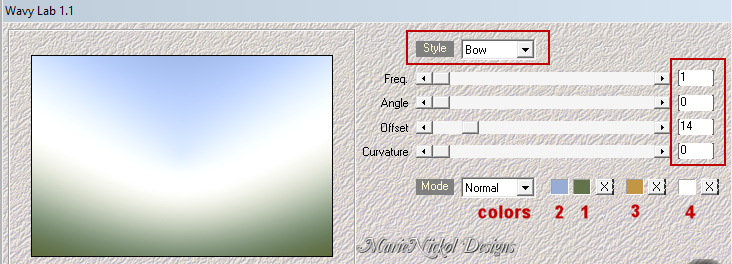
Layers - Duplicate
Step 2
Adjust - Blur - Radial Blur

Image - Resize - 80% - Resize All Layers - Not Checked
Step 3
Activate the Selection Tool (S) ![]() - Layer Opaque
- Layer Opaque ![]()
![]()
Effects - 3D Effects - Drop Shadow (2/2/100/2) color 4 ![]() #ffffff - Shadow on new layer not checked
#ffffff - Shadow on new layer not checked
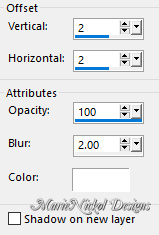
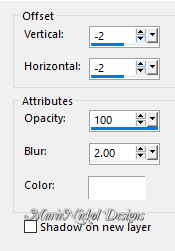
Effects - 3D Effects - Drop Shadow (-2/-2/100/2) color 4 ![]() #ffffff - Shadow on new layer not checked
#ffffff - Shadow on new layer not checked
Step 4
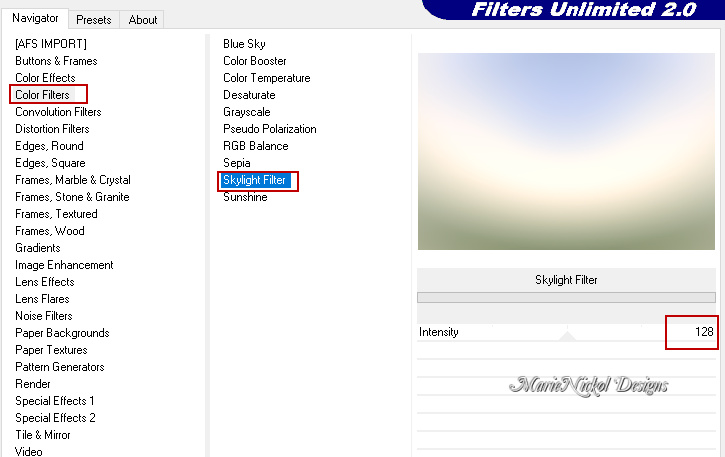
Effects - Plugins - I.C.NET Software-Filters Unlimited 2 - Color Filters - Skylight Filter (default settings)
Selections - Select None
Step 5
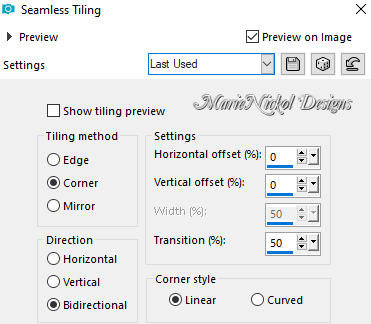
Effects - Image Effects - Seamless Tiling (default settings)
Step 6
Image - Rotate Right
Effects - Plugins - Toadies - What Are You?

Image - Rotate Left
In your Layer Properties - set the Blend mode to Multiply
Step 7
Selections - Load/Save Selection - Load Selection From Disk
Load selection - mnflowers_selection1
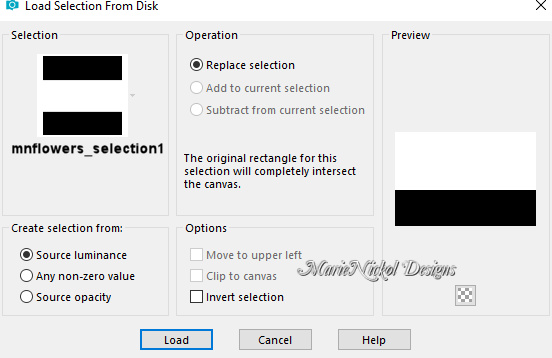
Edit - Cut
Edit - Paste As New Layer
Selections - Select None
Objects - Align - Top
(Note: If you do not have the Command Objects on your version of PSP use the Pick Tool (K)
Activate the Pick Tool (K)![]() - Enter these values for positions X and Y on the Toolbar:
- Enter these values for positions X and Y on the Toolbar:
X 0.00 Y 0.00

Press M to release the Pick Tool)
Step 8
Selections - Load/Save Selection - Load Selection From Disk
Load selection - mnflowers_selection2
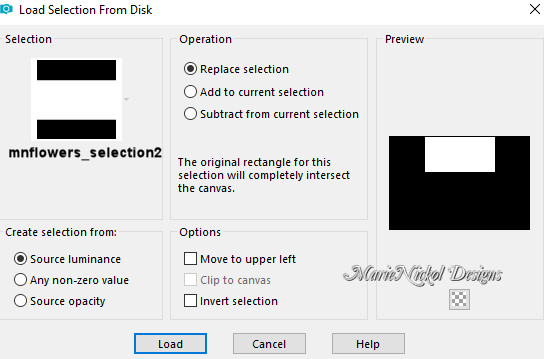
Selections - Promote Selection to Layer
Effects - Distortion effects- Polar coordinates
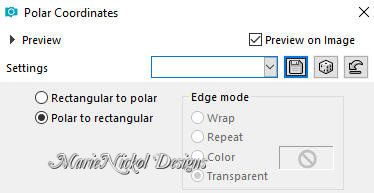
Repeat - Effects - Distortion effects- Polar coordinates
Effects - Artistic Effects - Enamel
Selections - Select None
Step 9
Effects - Image Effects - Seamless Tiling
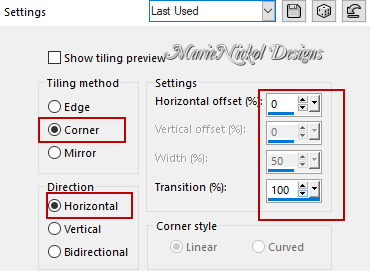
Effects - Distortion effects- Wave

Repeat - Effects - Image Effects - Seamless Tiling

Step 10
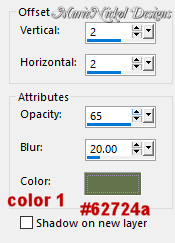
Effects - 3D Effects - Drop Shadow (2/2/65/20) color 1 ![]() #62724a - Shadow on new layer not checked
#62724a - Shadow on new layer not checked
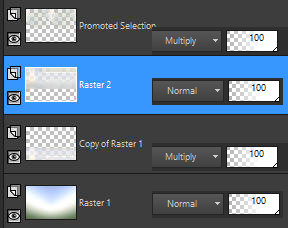
Your layers look like this:
Step 11
Activate the second layer from the top - Raster 2
Layers - Delete
Step 12
Activate the second layer from the bottom - Copy of Raster 1
In your Layer Properties - set the Blend mode to Normal
Effects - Edge Effects - Enhance
Effects - Plugins - Filter I.C.NET Software-Filters Unlimited 2 - VM Distortion - Vision Impossible
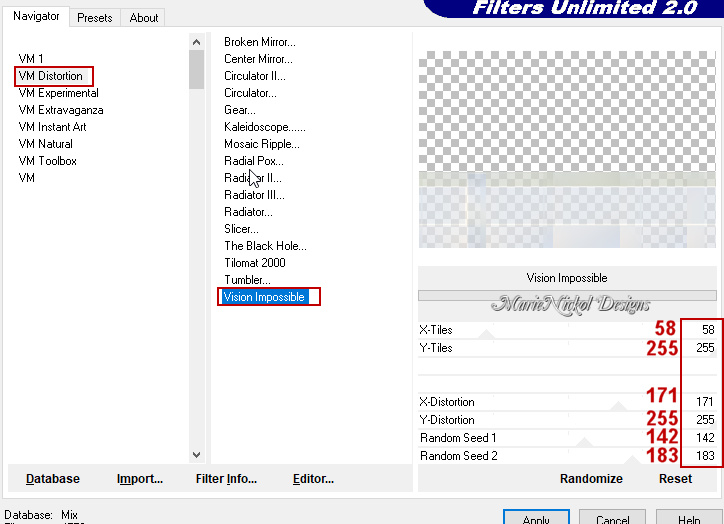
Layers - Duplicate
Image - Flip
Effects - Image Effects - Seamless Tiling
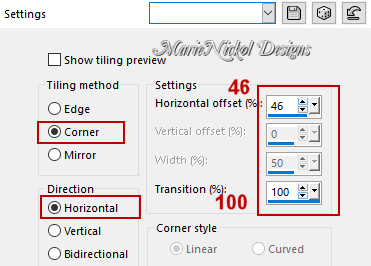
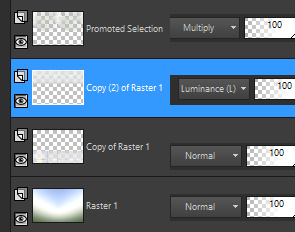
In your Layer Properties - set the Blend mode to Luminance (Legacy)
Your layers look like this:
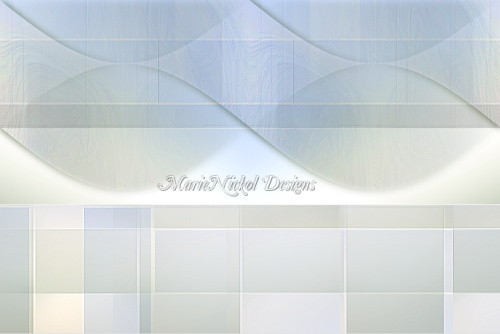
Your image looks like this:
Step 13
Material Properties - Set your Background color to color 4 ![]() #ffffff
#ffffff
Activate the top layer - Promoted Selection
Layers - New Raster Layer
Selections - Load/Save Selection - Load Selection From Disk
Load selection - mnflowers_selection3
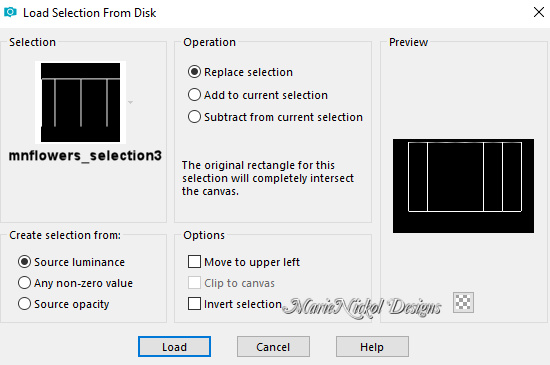
Flood fill tool / Fill in the Selection with your Background color white
Selections - Select None
Step 14
Selections - Load/Save Selection - Load Selection From Disk
Load selection - mnflowers_selection4
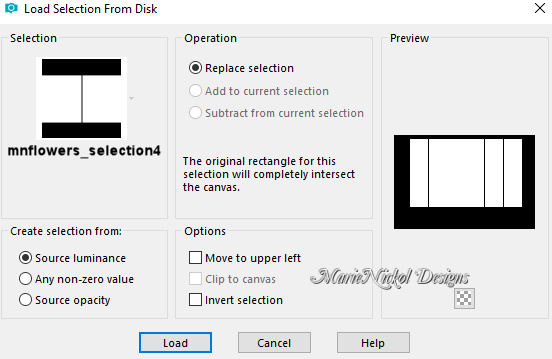
Open tube - mnflowers
Edit - Copy
Layers - New Raster Layer
Edit - Paste - Paste into Selection on your working image
Layers - Arrange - Move down
Activate the top layer - Raster 2
Layers - Merge - Merge Down
Selections - Select None
Step 15
Image - Resize - 25% - Resize All Layers - Not Checked
Activate the Pick Tool (K)![]() - Enter these values for positions X and Y on the Toolbar:
- Enter these values for positions X and Y on the Toolbar:
X (278.00) Y (415.00)
![]()
Press M to release the Pick Tool
Step 16
Layers - Duplicate
Image - Mirror
Activate the Pick Tool (K)![]() - Enter these values for positions X and Y on the Toolbar:
- Enter these values for positions X and Y on the Toolbar:
X (66.00) Y (415.00)
![]()
Press M to release the Pick Tool
In your Layer Properties - set the Blend mode to Overlay
Step 17
Activate the layer underneath - Raster 3
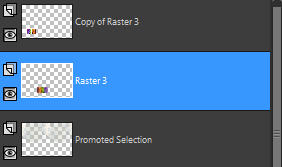
Effects - Plugins - MuRa's-Meister - Copies
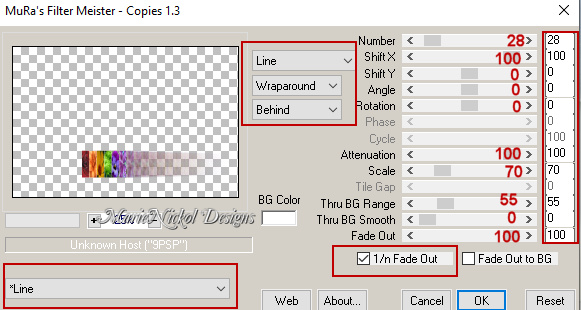
Step 18
Activate the top layer - Copy of Raster 3
Open tube - Drevers_misted_flower_3
Edit - Copy
Edit - Paste - Paste As New Layer on your working image
Image - Resize - 85% - Resize All Layers - Not Checked
Activate the Pick Tool (K)![]() - Enter these values for positions X and Y on the Toolbar:
- Enter these values for positions X and Y on the Toolbar:
X (47.00) Y (-70.00)
![]()
Press M to release the Pick Tool
Step 19
Layers - Duplicate
Image - Mirror
Layers - Merge - Merge Down
Layer Properties - set the Blend mode to Overlay and the Opacity to 60
Step 20
Open tube - mntube_circles
Edit - Copy
Edit - Paste - Paste As New Layer on your working image
Activate the Pick Tool (K)![]() - Enter these values for positions X and Y on the Toolbar:
- Enter these values for positions X and Y on the Toolbar:
X (334.00) Y (69.00)
![]()
Press M to release the Pick Tool
Layer Properties - set the Opacity to 70
Step 21
Materials Properties - Set your Foreground color to color 3 ![]() #c39645
#c39645
Layers - New Raster Layer
Selections - Load/Save Selection - Load Selection From Disk
Load selection - mnflowers_selection5
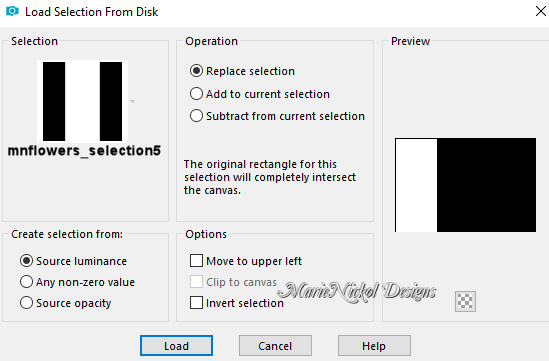
Activate the Flood fill tool ![]() and lower the Opacity to 20
and lower the Opacity to 20
![]()
Fill in the Selection with your Foreground color - Color 3 ![]() #c39645
#c39645
Set the Opacity back to 100
Step 22
Selections - Load/Save Selection - Load Selection From Disk
Load selection - mnflowers_selection6
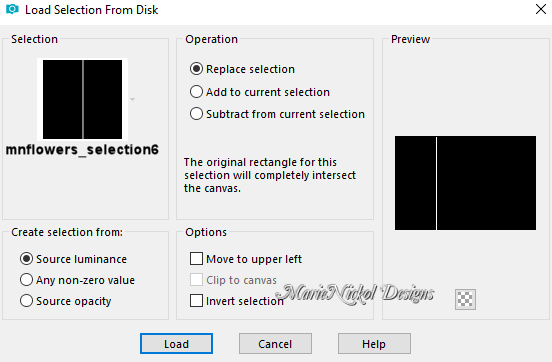
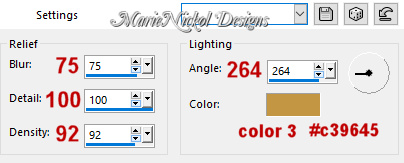
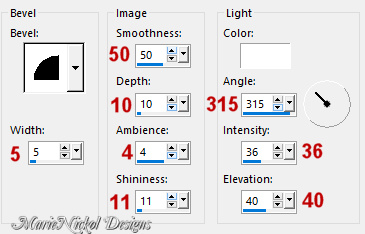
Effects - 3D Effects - Inner Bevel
Effects - Plugins - I.C.NET Software - Filters Unlimited 2 - Tramages - Pool Shadow (default settings)

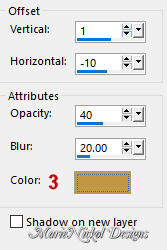
Effects - 3D Effects - Drop Shadow (1/-10/40/20) color 3 ![]() #c39645 - Shadow on new layer not checked
#c39645 - Shadow on new layer not checked
Effects - Edge Effects - Enhance More
Selections - Select None
Step 23
Effects - Distortion Effects - Warp
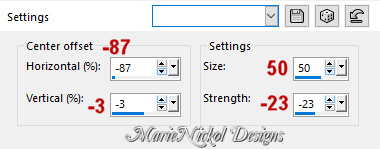
Effects - 3D Effects - Drop Shadow (-2/5/55/20) color 5 ![]() #000000 - Shadow on new layer not checked
#000000 - Shadow on new layer not checked
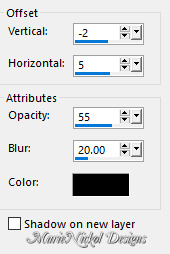
In your Layer Properties - set the Blend mode to Luminance (Legacy)
Step 24
Activate the bottom layer - Raster 1 and close the eye of this layer
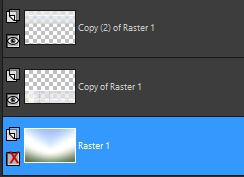
Activate the top layer
Layers - Merge - Merge Visible
Open the eye of layer - Raster 1
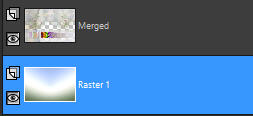
Step 25
Layer Raster 1 is active
Layers - Duplicate
Image - Flip
Layer Properties - set the Blend mode to Multiply
Layers - Merge - Merge Down
Effects - Plugins - Carolaine and Sensibility - CS-Linear-H (default settings)
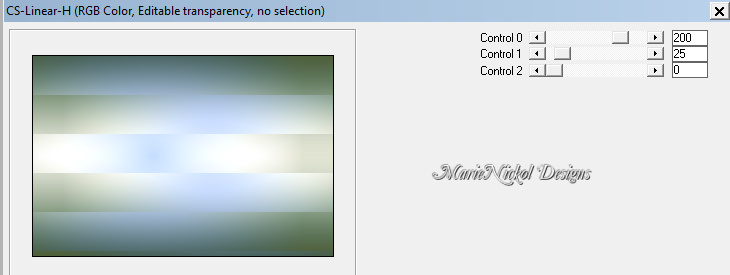
Step 26
Effects - Texture Effects - Blinds
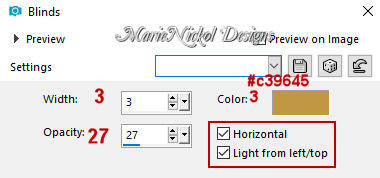
Step 27
Effects - Plugins - <I.C.NET Software> - Filters Unlimited 2.0 - VM Stylize - Motion Trail Wild (default settings)
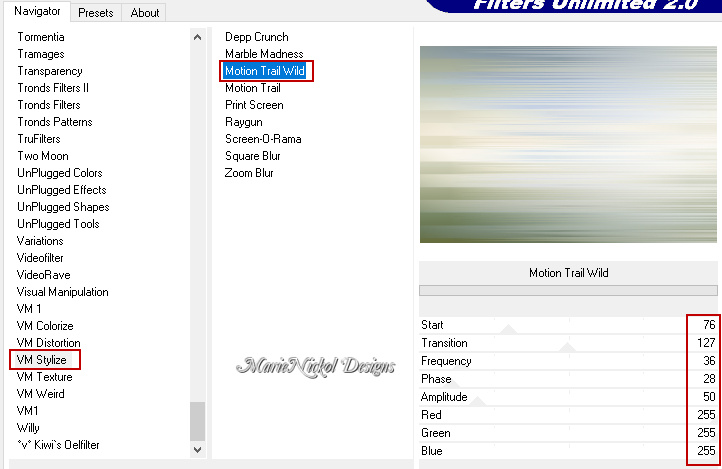
or if the plugin works as a standalone for you
Effects - Plugins - VM Toolbox - Motion Trail Wild (default settings)

Step 28
Effects - Reflection Effects - Rotating Mirror
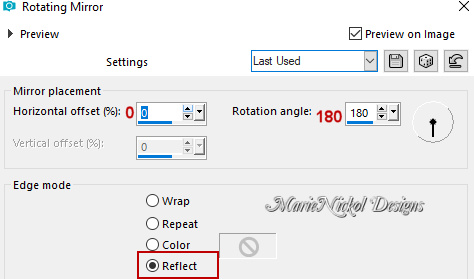
Effects - Artistic Effects - Enamel (the same settings as in Step 8 - settings are still in memory)

Edit - Copy
Edit - Paste As New Image and minimize for later
Step 29
Activate the top layer - Merged
Open the text tube - mntext_flowers
Edit - Copy
Edit - Paste - Paste As New Layer on your working image
Activate the Pick Tool (K)![]() - Enter these values for positions X and Y on the Toolbar:
- Enter these values for positions X and Y on the Toolbar:
X (201.00) Y (352.00)
![]()
Press M to release the Pick Tool
Step 30
Image - Add Borders - 1 px - Symmetric checked color 4 ![]() #ffffff
#ffffff
Image - Add Borders - 1 px - Symmetric checked color 2 ![]() #97add5
#97add5
Image - Add Borders - 1 px - Symmetric checked color 3 ![]() #c39645
#c39645
Image - Add Borders - 2 px - Symmetric checked color 1 ![]() #62724a
#62724a
Selections - Select All
Step 31
Image - Add Borders - 50 px - Symmetric checked color 4 ![]() #ffffff
#ffffff
Selections - Invert
Edit - Paste - Paste into Selection the background image you saved in Step 28 above
Selections - Invert
Effects - 3D Effects - Drop Shadow (0/0/55/25) color 5 ![]() #000000 - Shadow on new layer not checked
#000000 - Shadow on new layer not checked
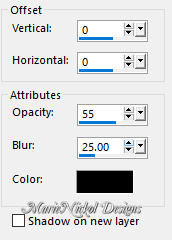
Selections - Select None
Step 32
Open the text tube - mntext_vertical
Edit - Copy
Edit - Paste - Paste As New Layer on your working image
Activate the Pick Tool (K)![]() - Enter these values for positions X and Y on the Toolbar:
- Enter these values for positions X and Y on the Toolbar:
X (19.00) Y (65.00)
![]()
Press M to release the Pick Tool
Step 33
Open the tube - mnwoman_flowers
(Note: your own tube)
Edit - Copy
Edit - Paste - Paste As New Layer on your working image
Position it as shown on the final result
Add a drop shadow to your own liking
Step 32
Image - Add Borders - 1 px - Symmetric checked color 4 ![]() #ffffff
#ffffff
Image - Add Borders - 1 px - Symmetric checked color 2 ![]() #97add5
#97add5
Image - Add Borders - 1 px - Symmetric checked color 3 ![]() #c39645
#c39645
Image - Add Borders - 2 px - Symmetric checked color 1 ![]() #62724a
#62724a
Step 33
Layers - New Raster Layer
Add your name or watermark
Layers - Merge - Merge All (Flatten)
Image - Resize - 900 pixels width (the height will adapt)
File - Export - Save as JPG file
***
I hope you enjoyed this tutorial.
If you do this tutorial, please email your version to me
~~~~~~~~~~
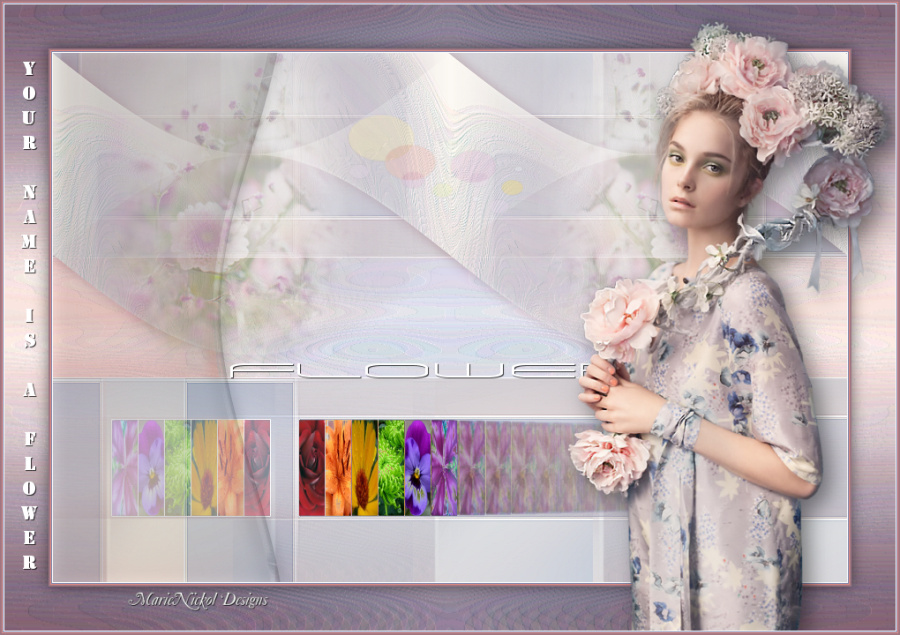
My second version in a different color
Tube used woman by Nikita
~~~~~~~~~~
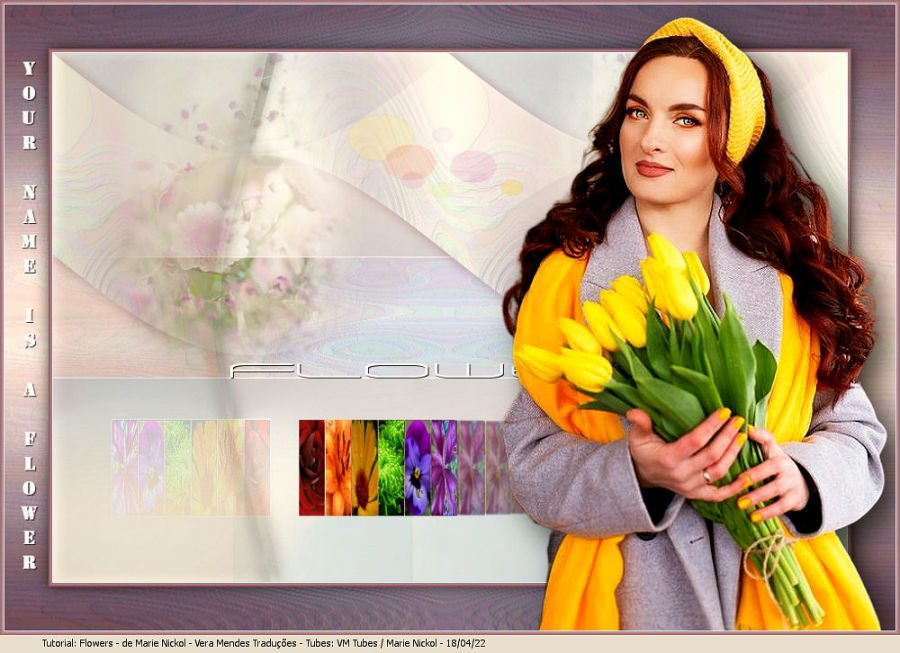
Your Versions
Thank you so much Vera for your magnificent version
~~~~~~~~~~
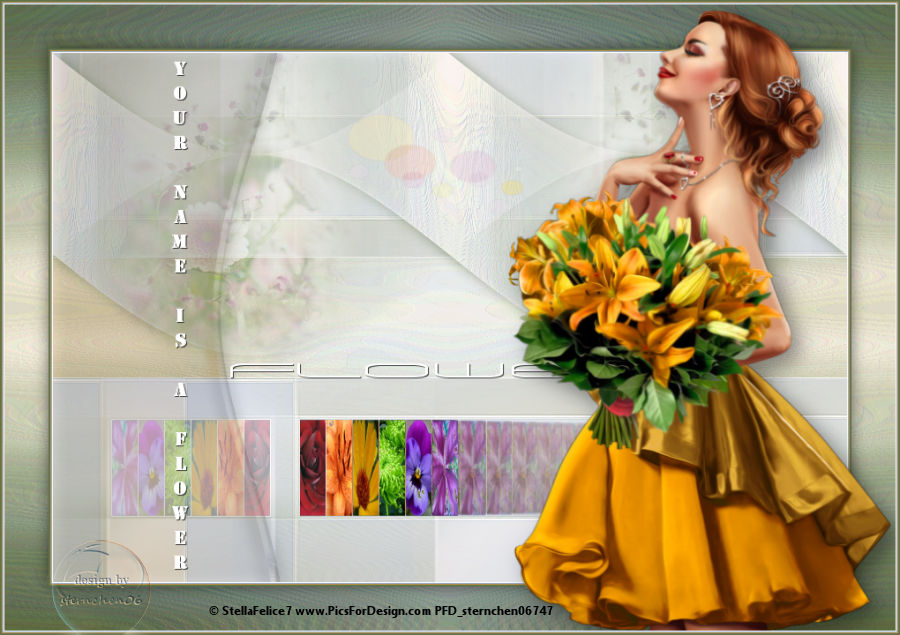
Thank you so much Sternchen for your magnificent version
~~~~~~~~~~
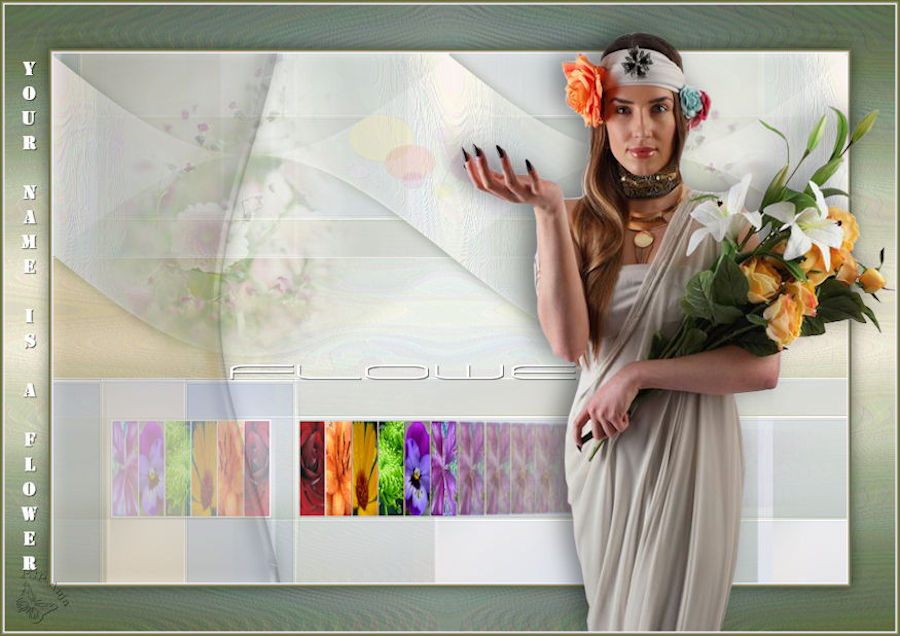
Thank you so much Anja for your magnificent version
~~~~~~~~~~
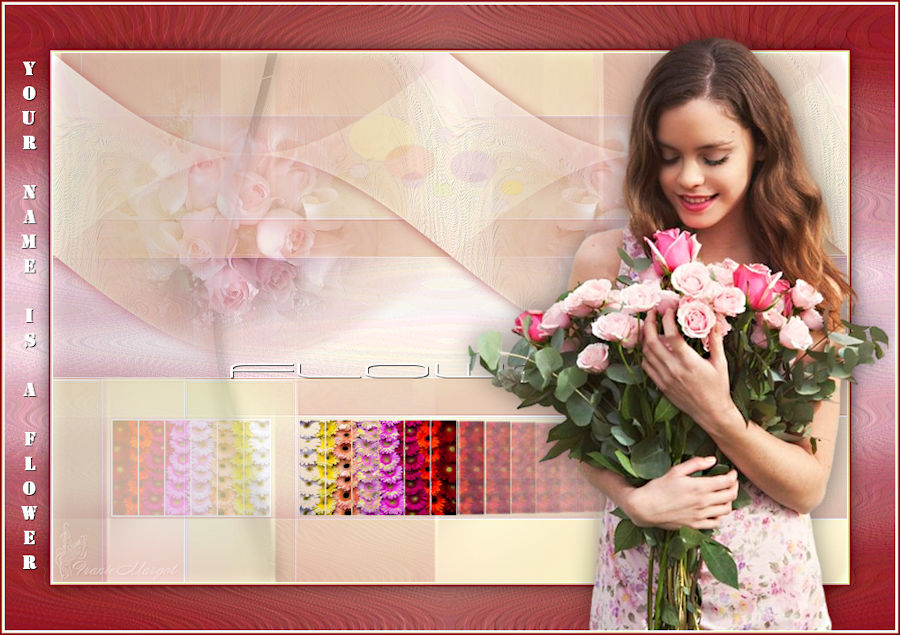
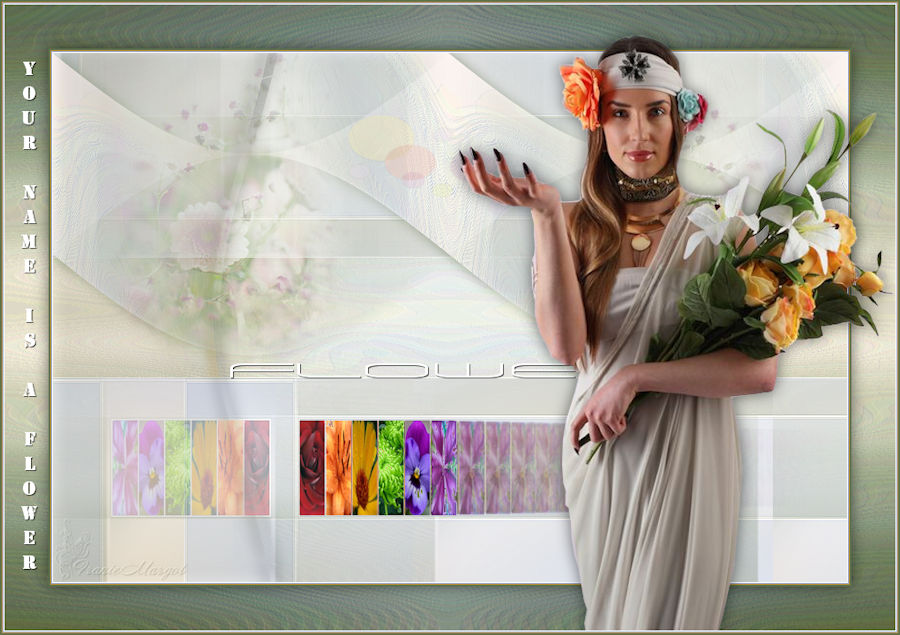
Thank you so much Franie Margot for your magnificent versions
~~~~~~~~~~
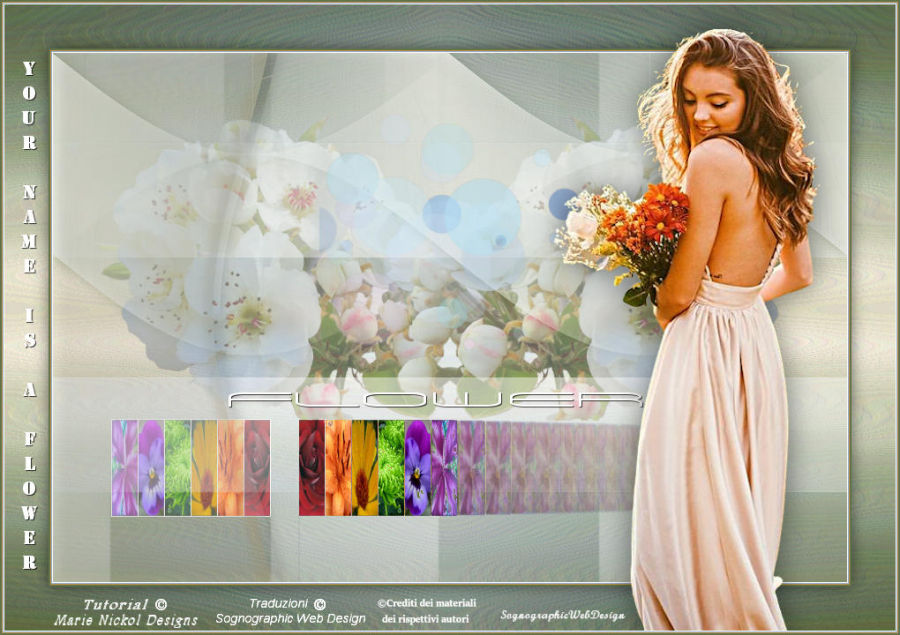
Thank you so much Isabella (Sognografica) for your magnificent version
~~~~~~~~~~
1 2
